Some time ago there was an explosion of articles and talks in the iOS community about "unidirectional flow" architectures, inspired by Redux library from JavaScript. The dust has settled since then but as a result of this storm, we now have ReSwift and other implementations of this approach. Reactive programming adepts didn't stay away for long and came up with RxFeedback. At Babylon, we use ReactiveCocoa so we've built ReactiveFeedback. In this article, you'll see how we use it to build the whole features in our app, not just increment counters so there will be a lot of code (you can see the whole code in this gist).
One of the differences from what you will see in most of the tutorials about this approach is that we don't have a global application state. We simply don't need it as we build our app from a set of microfeatures, from a bootstrapping state when the user starts the app to the implementation of each and every application flow. Every feature has a clear "entry point" for the rest of the code to interact with it and has it's own state isolated from the rest of the app.
To demonstrate our approach we will build an interface that allows users to make a list of pharmacies where they prefer their medications to be delivered. This is a real feauture that I was working on recently. Here is how the final result will look like:
On the screen we are going to implement user will see an empty state placeholder when there are no previously saved pharmacies, will be able to add pharmacies from the map screen, delete previously added pharmacies and finally select a pharmacy for delivery, which will dismiss this screen.
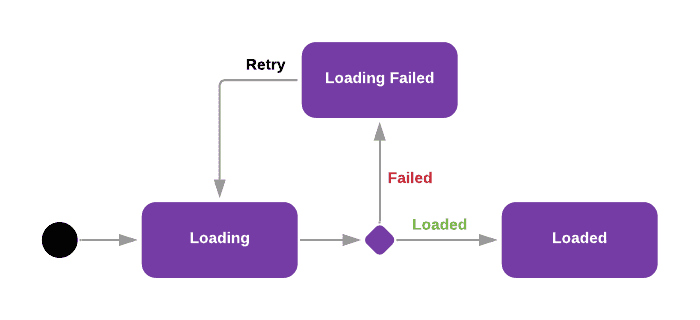
As Redux in its essence is just a state machine we start with defining states and possible transitions between them. Apart from states and transitions, we will define "actions" - events that trigger state transitions, and "signals" - events sent out by the state machine to perform side effects i.e. presenting another screen.
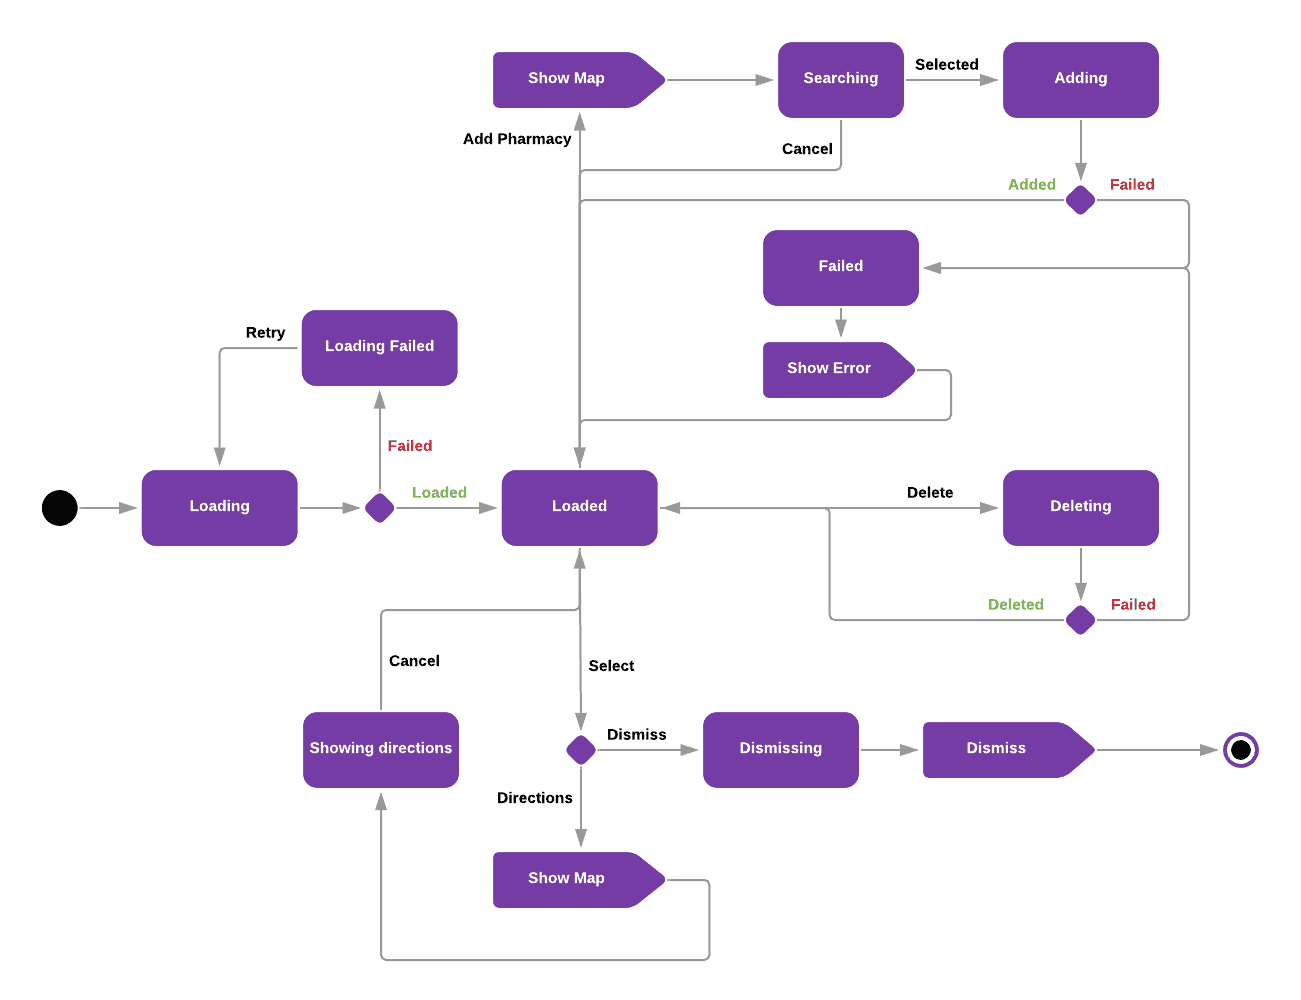
We start with loading state, of course. In case of loading data, in this case, the list of pharmacies previously saved by the user, succeeds we go to loaded state, or otherwise in loading failed state from where we can go back to loading state using retry action.
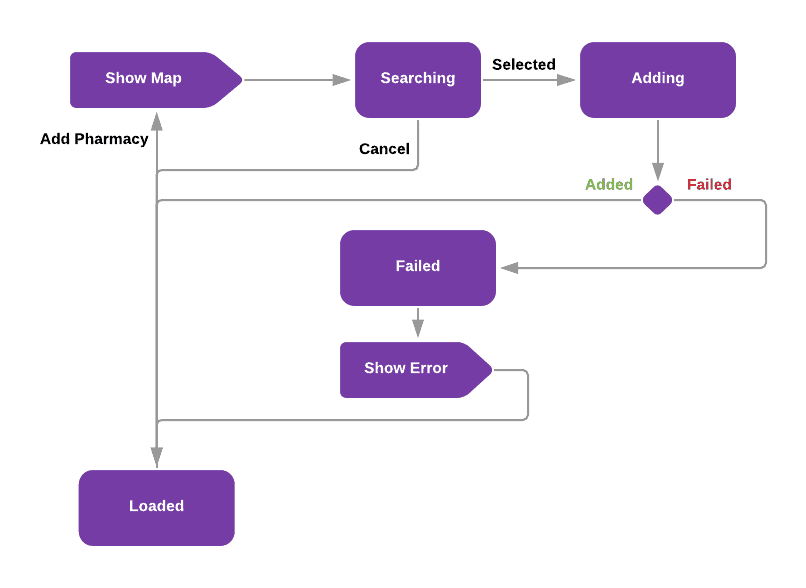
From loaded state using add pharmacy action we go to searching state. During this transition, we send show map signal to display map user interface. When the user closes the map without selecting any pharmacy we go back to loaded state. When the user selects a pharmacy on the map we go to adding state. If adding pharmacy succeeds we go to loaded state with this pharmacy added, otherwise we go to failed state which immediately sends show error signal and goes back to loaded state.
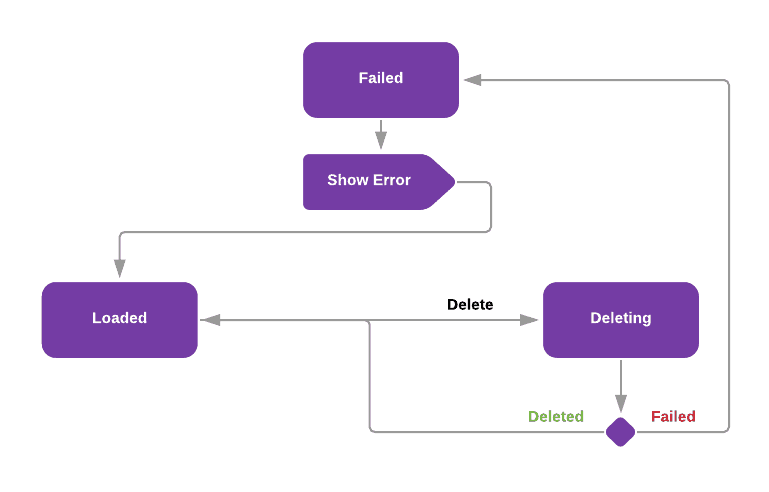
Similarly to this when user deletes pharmacy we go to deleting state and if deleting succeeds we go to loaded state with this pharmacy deleted from the list, otherwise to failed state, send show error signal and go back to loaded state keeping this pharmacy in the list.
Finally, when the user selects pharmacy from the list we can either exit the flow and return selected pharmacy to the caller through dismissing state and dismiss signal, or we can display directions to the selected pharmacy which will send show map signal and then go to showing directions state. When the user closes the map we go back to loaded state.
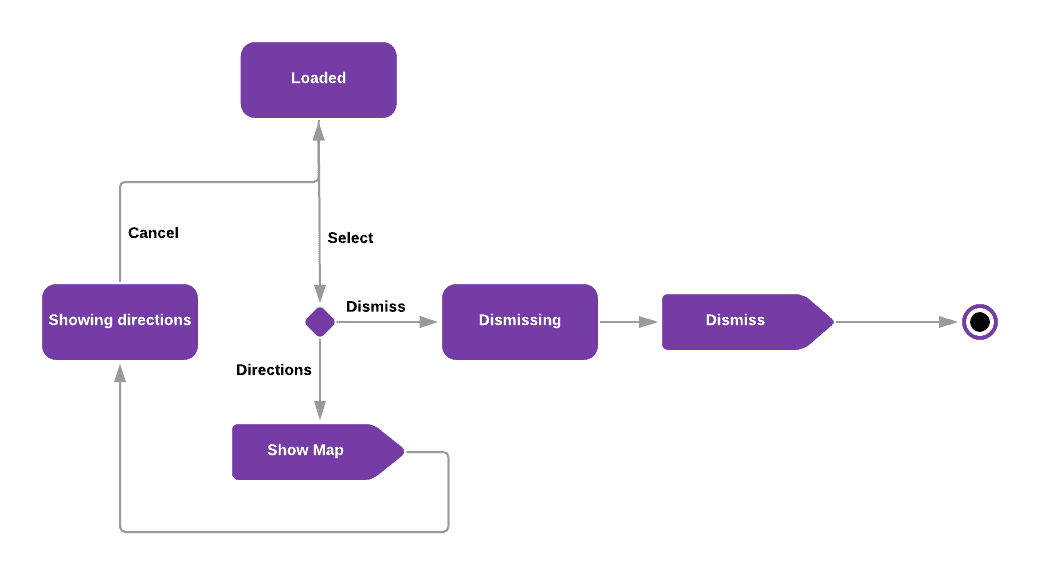
Here is the final diagram. It looks a bit complicated but when you break it down into pieces like we just did it becomes pretty simple to understand.
Now let's implement it!
We start with bootstrapping feature using Xcode templates that we've created. This saves us from writing some boilerplate code and ensures that each implementation follows the same structure and naming conventions. Programming is a creative process but this creativity should be controlled in large teams.
Using the template we end up with few files each containing one type - builder, flow controller, view model, and renderer. Each of them serves its own single purpose. This break down is similar to what you might have seen in VIPER or other patterns. Let's go through these types one by one.
Builder
The builder is a main entry point to the feature. It defines and implements an external interface for the rest of the code to interact with the feature, i.e. here func make() -> UIViewController. There might be several of such entry points depending on a use case. Implementation of this interface takes care of creating and wiring together all other components - flow controller, view model, and renderer. The output is typically a view controller. As you can see nothing except view controller leaves the builder. This way we achieve a high level of isolation of the feature making it a black box for the rest of the code - nothing but what we pass as input parameters to make function (it's empty now but we will fill it soon) can affect the feature.
protocol PharmaciesListChildBuilders {}

struct PharmaciesListBuilder: PharmaciesListChildBuilders {
    init() {}

    func make() -> UIViewController {
        let viewModel = PharmaciesListViewModel()

        let viewController = BabylonBoxViewController(
            viewModel: viewModel,
            renderer: PharmaciesListRenderer.self,
            rendererConfig: PharmaciesListRenderer.Config()
        )

        let flowController = PharmaciesListFlowController(
            modal: viewController.modalFlow,
            builders: self
        )

        viewModel.routes
            .observe(on: UIScheduler())
            .observeValues(flowController.handle)

        return viewController
    }
}
Flow controller
You are probably familiar with this concept already. You might have heard about "coordinators" and "routers". The flow controller is a similar concept. Its responsibility is to implement navigation. For navigation, we use a concept of "flows" throughout our app. It serves us as an abstraction of different presentation styles, mostly modal and navigation, used to present view controllers. Method func handle(_: PharmaciesListViewModel.Route) implements the navigation logic and is an observer of the view model's routes signal. In this method, the flow controller decides what and how to present depending on the route value it receives from a view model.
final class PharmaciesListFlowController {
    private let presenting: Flow
    private let modal: Flow
    private let builders: PharmaciesListChildBuilders

    init(presenting: Flow,
            modal: Flow,
            builders: PharmaciesListChildBuilders) {
        self.presenting = presenting
        self.modal = modal
        self.builders = builders
    }

    func handle(_ route: PharmaciesListViewModel.Route) {
        switch route {

        }
    }
}
Renderer
As the name implies this type renders UI. It does it using Bento, our declarative UI framework. The way it works is similar to React. Instead of working with views directly we define a virtual representation of user interface as a tree-like structure. Similar to React this representation is a function of the state. When a new tree is created as a result of the state change the difference between the old and the new tree is calculated and the user interface is updated accordingly. As our app contains a lot of forms the main focus of Bento is table and collection views. In fact, even screens that don't look like forms, i.e. empty state screen that you could see on the video, are implemented using this approach. Almost every screen in our app is either table or collection view powered by Bento (or its predecessor).
typealias Sink<Action> = (Action) -> Void

struct PharmaciesListRenderer: BoxRenderer {
    private let config: Config
    private let observer: Sink<PharmaciesListViewModel.Action>

    struct Config {}

    init(observer: @escaping Sink<PharmaciesListViewModel.Action>,
            config: Config) {
        self.config = config
        self.observer = observer
    }

    func render(state: PharmaciesListViewModel.State) -> Screen<SectionId, NodeId> {
        return Screen(box: .empty)
    }

}

extension PharmaciesListRenderer {

    enum SectionId: Hashable {
        case first
    }

    enum NodeId: Hashable {
        case first
    }
}
View model
This is a central piece of the puzzle that implements all the business logic and controls the state. You can imagine that it's a rather complex type so let's look at its pieces one by one. The main building blocks of every view model are state property, reducer function and routes signal. The state represents the state of our system, reducer is a function that based on the current state and incoming event produces a new state. And the routes is the signal observed by the flow controller so that it can perform navigation.
final class PharmaciesListViewModel: BoxViewModel {

    let state: Property<State>
    let routes: Signal<Route, NoError>

    private let (actions, actionsObserver) = Signal<Action, NoError>.pipe()

    init() {
        state = Property(
            initial: .initial,
            reduce: PharmaciesListViewModel.reduce,
            feedbacks: [
                PharmaciesListViewModel
                    .userActions(actions: actions)
            ]
        )

        routes = .empty
    }

    func send(action: PharmaciesListViewModel.Action) {
        actionsObserver.send(value: action)
    }

    private static func reduce(_ state: State, _ event: Event) -> State {
        switch event {
        default:
            return state
        }
    }

}
Now, remember the state diagram we designed in the beginning? The "state" from this diagram is, obviously, state property of a view model, routes is a "signal", i.e. "show map" or "dismiss", and reducer function is what implements transitions between states.
Let's look closer at the state property. As you can see it's not a regular ReactiveSwift Property. Apart from the initial value, it has a reduce and feedbacks parameters.
state = Property(
    initial: .initial,
    reduce: PharmaciesListViewModel.reduce,
    feedbacks: [
        PharmaciesListViewModel
            .userActions(actions: actions)
    ]
)
Under the hood ReactiveFeedback framework will create a state machine like system which will use reduce function to produce new states when new events occur, and feedbacks to perform side-effects on state changes which can result in new events and further state changes. This way it defines a "feedback loop" - every time the state changes (including when it is created with its initial value) the system will go through all the feedbacks, some of them will trigger side effects, i.e. an asynchronous network call, as a result of this side effect an event can be emitted which then will be passed to the reducer along with the current state and the reducer will either produce a new state or return the current state (effectively discarding the event) and the loop will start over. As a result of every state change, the state property current value will be updated. Now note that it's a Property, not a MutableProperty. This means that this property value can't be changed from outside. The only way to change it is through feedbacks and events. This way we make sure that nothing but the state machine itself can affect its state.
This may sound familiar to you if you like me had to study control theory as it uses the concept of feedbacks extensively. I was not very attentive student back in my university days so it took me some time to realize that similarity.

Now let's look at the feedback. We have only one for now and it's pretty simple. All that it does is transforms events caused by user interactions with UI into state machine events.
extension PharmaciesListViewModel {

    func send(action: PharmaciesListViewModel.Action) {
        actionsObserver.send(value: action)
    }

    fileprivate static func userActions(
        actions: Signal<Action, NoError>
    ) -> Feedback<State, Event> {
        return Feedback { scheduler, state -> Signal<Event, NoError> in
            return actions.map(Event.ui).observe(on: scheduler)
        }
    }

}
The func send(action:) function is passed to the renderer as observer parameter (it has a Sink typealias which is actually just a typealias of (Action) -> Void so it matches the signature of this function). The renderer then binds this observer with UIControl.Events of controls that it renders. Action type here represents a subset of state machine events that can be triggered by the user. For example, when the user taps a button it will produce the Event.ui(Action.buttonTapped) event.
The rest of the view model code created by the template contains definitions of State, Action, Event and Route types.
extension PharmaciesListViewModel {

    enum State {
        case initial
    }

    enum Event {
        case ui(Action)
    }

    enum Action {}

    enum Route {}

}
Let's start filling them in.
State
Here is how the states that we defined earlier can be represented.
indirect enum State: Equatable {
    case loading
    case loadingFailed(CoreError)
    case loaded([PharmacyDTO], CoreError?)
    case searching([PharmacyDTO])
    case showingDirections([PharmacyDTO], Place)
    case adding([PharmacyDTO], PharmacyDTO)
    case deleting([PharmacyDTO], Int)
    case dismissing(State, PharmacyDTO?)
}
All the states that are possible after the content is loaded contain the list of pharmacies. This is done so that we can pass it from one state to another when performing transitions. Sometimes we extract this kind of common associated values in a separate type Context, but here we have only this piece of data to carry on, so we don't really need it, though we could define it just as typealias Context = [PharmacyDTO].
You can see that we don't have a failed case that we had on the state diagram. Instead, we combine it with loaded state by adding optional error as its second associated value. This way we model two states using one enum case - optionality of error property allows using one case for two distinctive states, with and without error.
The last interesting detail here is the dismissing state. It has an optional PharmacyDTO which will contain a pharmacy user selected for delivery (the "output" of the feature) or nil if the user dismisses the screen without selecting anything, and state which is the state in which the screen was dismissed - it can be loading, loaded or loadingFailed, because in all these states we show a "Cancel" button that the user can press. Now, remember that we treat UI as a function of the state. Every time the state changes the renderer will be invoked to produce a new UI based on a new state. Then it will be invoked for the dismissing state and will need to return something. But when the screen is dismissing we don't want anything on it to change, so we need to create exactly the same UI tree that we returned for the previous state. So we bundle it within dismissing state to be able to render it.
Events and Actions
State transitions happen on events. Some events can happen due to side effects like network calls, and some can happen due to user interactions with UI elements. To make the distinction clearer we separate UI events into Actions type and use a single Event case for all of them, case ui(Action). We also allow a different behavior of the feature - in some flows we want to show directions to the selected pharmacy and in others we just return selected pharmacy. For that, we use Action.Selection enum.
enum Event: Equatable {
    case ui(Action)
    case loaded([PharmacyDTO])
    case failed(CoreError)
    case mapResponse(Place?)
    case added(PharmacyDTO)
    case deleted
}

enum Action: Equatable {
    case addPharmacy
    case deletePharmacy(Int)
    case select(Int, Selection)
    case retry
    case cancel

    enum Selection: Equatable {
        case dismiss
        case showDirections
    }
}
Reducer
Reducer is the central part of any view model. It is a function that defines all state transitions and considering a number of states and transitions we have you can guess it's pretty complex. To simplify it we will break it into pieces, handling events for each state in a separate function. This will leave us with pretty boilerplate implementation:
static func reduce(_ state: State, _ event: Event) -> State {
    switch state {
    case .loading:
        return reduceLoading(state: state, event: event)
    case let .loadingFailed(error):
        return reduceLoadingFailed(state: state, event: event, error: error)
    case let .loaded(pharmacies, error):
        return reduceLoaded(state: state, event: event, pharmacies: pharmacies, error: error)
    case let .adding(pharmacies, pharmacy):
        return reduceAdding(state: state, event: event, pharmacies: pharmacies, pharmacy: pharmacy)
    case let .deleting(pharmacies, index):
        return reduceDeleting(state: state, event: event, pharmacies: pharmacies, index: index)
    case let .searching(pharmacies):
        return reduceSearching(state: state, event: event, pharmacies: pharmacies)
    case let .showingDirections(pharmacies, place):
        return reduceShowingDirections(state: state, event: event, pharmacies: pharmacies, place: place)
    case .dismissing:
        return state
    }
}
The main logic is now broken down into small pieces that are much easier to digest. When loading we need to handle loading failure, success and cancelation events. All other events we ignore by returning the current state:
static func reduceLoading(state: State, event: Event) -> State {
    switch event {
    case let .failed(error):
            return .loadingFailed(error)
    case let .loaded(pharmacies):
            return .loaded(pharmacies, nil)
    case .ui(.cancel):
            return .dismissing(state, nil)
    default:
        return state
    }
}
When loading failed we only care about retry event and cancelation:
static func reduceLoadingFailed(
    state: State,
    event: Event,
    error: CoreError
) -> State {
    switch event {
    case .ui(.retry):
            return .loading
    case .ui(.cancel):
            return .dismissing(state, nil)
    default:
        return state
    }
}
Loaded state reducer is a bit more complex as it has more possible transitions, but in the end, it's also pretty straight-forward. When a pharmacy is selected we also need to check an action assoicated with selection to either show the map or dismiss the screen.
static func reduceLoaded(
    state: State,
    event: Event,
    pharmacies: [PharmacyDTO],
    error: CoreError?
) -> State {
    switch event {
    case let .loaded(pharmacies):
        return .loaded(pharmacies, nil)
    case .ui(.addPharmacy):
        return .searching(pharmacies)
    case let .ui(.deletePharmacy(pharmacy)):
        return .deleting(pharmacies, pharmacy)
    case let .ui(.select(index, action)):
        switch action {
        case .dismiss:
            return .dismissing(state, pharmacies[index])
            case .showDirections:
            if let place = pharmacies[index].toPlace() {
                return .showingDirections(pharmacies, place)
            } else {
                return .loaded(pharmacies, nil)
            }
        }
        case .ui(.cancel):
        return .dismissing(state, nil)
    default:
        return state
    }
}
adding and deleting states reducers are pretty similar and straight-forward as well. When a pharmacy is added we add it to the pharmacies list and return to loaded state. When a pharmacy is deleted we remove it from the pharmacies list and return to loaded state. In case of an error, we return loaded state with an error value.
static func reduceAdding(
    state: State,
    event: Event,
    pharmacies: [PharmacyDTO],
    pharmacy: PharmacyDTO
) -> State {
    switch event {
    case let .didAdd(pharmacy):
        return .loaded(pharmacies + [pharmacy], nil)
    case let .didFail(error):
        return .loaded(pharmacies, error)
    default:
        return state
    }
}

static func reduceDeleting(
    state: State,
    event: Event,
    pharmacies: [PharmacyDTO],
    index: Int
) -> State {
    switch event {
    case .didDelete:
        var pharmacies = pharmacies
        pharmacies.remove(at: index)
        return .loaded(pharmacies, nil)
    case let .didFail(error):
        return .loaded(pharmacies, error)
    default:
        return state
    }
}
When the user searches for a pharmacy on a map we only need to handle the event of selecting a place on the map. To avoid adding the same pharmacy multiple times we check if it is already on the list to decide if we should add it or ignore it.
static func reduceSearching(
    state: State,
    event: Event,
    pharmacies: [PharmacyDTO]
) -> State {
    switch event {
    case let .didSelectPlace(response):
        if case let .selected(place) = response,
            !pharmacies.contains(where: {
                $0.reference == place.reference
            }) {
            return .adding(pharmacies, PharmacyDTO(place))
        } else {
            return .loaded(pharmacies, nil)
        }
    default:
        return state
    }
}
Finally, when the map is presented to show directions to the pharmacy we are not actually interested in handling any specific events because the map, in this case, does not provide any return value, so we simply can return .loaded state on didLoad event that as you will see soon happens right after state changes to showingDirections. Alternatively, we could produce an Event when the map is dismissed and hande it here so that our system stays in the showingDirections state while the map is presented.
static func reduceShowingDirections(
    state: State,
    event: Event,
    pharmacies: [PharmacyDTO],
    place: Place
) -> State {
    switch event {
    case let .didLoad(pharmacies):
        return .loaded(pharmacies, nil)
    default:
        return state
    }
}
Feedbacks
Now lets finally look at the most interesting yet simple part of the view model - feedbacks. You already saw one feedback that effectively maps UI actions into state changes. The rest of the feedbacks are handling all other events unrelated to UI interactions, mostly network calls responses. Typically each feedback has an effect only in a particular state. It is not something that is enforced by the ReactiveFeedback so on one event multiple feedbacks can be invoked and can result in multiple side-effects being triggered.
Let's start with a loading feedback. All that it does is starting a network call to fetch a list of saved pharmacies and map its result into Event.
static func whenLoading(
    businessController: PharmaciesBusinessControllerProtocol
) -> Feedback<State, Event> {
    return Feedback { state -> SignalProducer<Event, NoError> in
        guard case .loading = state else { return .empty }

        return businessController.fetch()
            .map(Event.didLoad)
            .replaceError(Event.didFail)
    }
}
Similarly feedbacks for adding and deleting pharmacy trigger network calls and map their results into Event.
static func whenAdding(
    businessController: PharmaciesBusinessControllerProtocol
) -> Feedback<State, Event> {
    return Feedback { state -> SignalProducer<Event, NoError> in
        guard case let .adding(_, pharmacy) = state,
            let reference = pharmacy.reference else { return .empty }

        return businessController.add(pharmacy: AddPharmacyRequest(reference: reference))
            .map(Event.didAdd)
            .replaceError(Event.didFail)
    }
}

static func whenDeleting(
    businessController: PharmaciesBusinessControllerProtocol
) -> Feedback<State, Event> {
    return Feedback { state -> SignalProducer<Event, NoError> in
        guard case let .deleting(pharmacies, index) = state else { return .empty }

        return businessController.delete(pharmacy: pharmacies[index])
            .map { _ in Event.didDelete }
            .replaceError(Event.didFail)
    }
}
When showing directions or when an error happens (i.e. network request fails) we only need to present a map or an alert with an error message. This only involves navigation logic and if you remember for that we use the routes signal. This way these feedbacks only need to restore the system to the loaded state what they can do by producing .didLoad event.
static func whenFailed() -> Feedback<State, Event> {
    return Feedback { state -> SignalProducer<Event, NoError> in
        guard case let .loaded(pharmacies, _?) = state else { return .empty }

        return .value(.didLoad(pharmacies))
    }
}

static func whenShowingDirections() -> Feedback<State, Event> {
    return Feedback { state -> SignalProducer<Event, NoError> in
        guard case let .showingDirections(pharmacies, _) = state else { return .empty }

        return .value(.didLoad(pharmacies))
    }
}
Routes
The last piece of the view model is routes signal. It is observed by the flow controller to perform navigation when a new route is sent by the view model and effectively serves as an entry point into other features.
routes = state.signal.skipRepeats().filterMap { state in
    switch state {
    case let .loaded(_, error?):
        return .showAlert(.make(error: error))
    case .searching:
        return .showMap(mapResponsesObserver.send(value:))
    case let .showingDirections(_, place):
        return .showDirections(place)
    case let .dismissing(_, selectedPharmacy):
        return .dismiss {
            selectedPharmacy.map { pharmacySelectionObserver?.send(value: $0) }
        }
    default:
        return nil
    }
}
As you can see routes signal is directly derived from state property. We could also derive it from actions signal. In this case, we wouldn't need some states and corresponding feedbacks like showingDirections and instead will observe action select(index, .showDirections). But this breaks the property of our system that the state is the single source of truth of everything happening in it. Also having these "transient" states helps to have a more complete picture of the system.
With this we can now implement the flow controller that all fits into one function:
func handle(_ route: PharmaciesViewModel.Route) {
    switch route {
    case let .showMap(response):
        BabylonNavigationController { [presenting = self.modal] _, modal in
            builders.makeMap(response: response, modal: modal, presenting: presenting)
        } |> modal.present
    case let .showDirections(place):
        builders.makeDirectionsMap(for: place, modal: modal, presenting: presenting)
            |> presenting.present
    case let .showAlert(error):
        UIAlertController.make(error: error)
            |> modal.present
    case let .dismiss(completion):
        completion
            |> presenting.dismiss
    }
}
Rendering
To wrap up let's see a high-level implementation of the renderer. It is a very simple, and pure, function that based on state value returns UI tree to be rendered by Bento framework. In most of the states, we are rendering a list of pharmacies. In the .loading or .loadingFailed states or when no pharmacies are saved we are rendering screen in an "empty" state, which can render a spinner or a placeholder with an icon and an action button to reload the list or add the first pharmacy.
func render(state: PharmaciesViewModel.State) -> Screen<SectionId, RowId> {
    switch state {
    case .loading:
        return render(emptyState: .loading)
    case .loadingFailed:
        return render(emptyState: .error)
    case let .loaded(pharmacies, _),
            let .searching(pharmacies),
            let .showingDirections(pharmacies, _):
        if pharmacies.isEmpty {
            return render(emptyState: .empty)
        } else {
            return render(pharmacies: pharmacies)
        }
    case let .adding(pharmacies, pharamacy):
        return render(pharmacies: pharmacies + [pharamacy])
    case .deleting(var pharmacies, let index):
        pharmacies.remove(at: index)
        return render(pharmacies: pharmacies)
    case let .dismissing(state, _):
        return render(state: state)
    }
}
I will not go into more implementation details as it deserves a separate post, but if you are curious you can look at the Bento example or final gist.
Wrap up
Now you should have a picture of architecture we use to develop features. You can draw some lines between it and the VIPER in how we break responsibilities between types. One of the benefits of such separation is that extracting navigation and rendering logic from a view model allows us to separate it from UIKit related side-effects which makes it easier to unit test. Separating rendering logic also allows us to test it easily (using FBSnapshotTest) without caring about mocking network calls performed by the view model.
Using ReactiveFeedback to model the state machine which is the main driver of the view model helps us to control its side-effects which is also easy to test either by testing reducer function directly or by testing view model as a black box asserting how the state changes when events happen. It also bridges the Redux approach with the reactive programming that is in the heart of our development culture.
By continuously applying this pattern across the app, with the help of Xcode templates, we make it easier for us to understand parts of it we didn't work on before or start a development of a new feature, even though some implementation details may differ. This is crucial to ensure maintainability of the code base that is actively worked on by more than 10 people at the same time, no matter what pattern you choose for that.